No long-winded intro this time, let's just jump right into it.
Today we're going to see how to make the animation from the last post about my experience using Reanimate. We won't go all the way to building the full animation, just showing enough of how Reanimate works to where you could build up the rest yourself.
You'll need Stack installed, as well as ffmpeg version 4.1.3 or greater.
Step 1: Baby's first animation
Create a new Stack project using the LTS 14.27 resolver. You can name it whatever you want; I'll go with "nqueens" for the rest of this post.
$ stack new --resolver lts-14.27 nqueensAdd Reanimate and reanimate-svg to the dependencies of the executable in package.yaml, and get rid of the library dependency...
executables:
  nqueens-exe:
    main:                Main.hs
    source-dirs:         app
    ghc-options:
    - -threaded
    - -rtsopts
    - -with-rtsopts=-N
    dependencies:
    - reanimate
    - reanimate-svg
...and you're good to go to start creating animations.
Place the following in app/Main.hs:
module Main where

import Reanimate
import Reanimate.Builtin.Documentation

main :: IO ()
main = reanimate (docEnv (drawBox `parA` drawCircle))
Then build and run the program, passing args telling Reanimate to render the output to a GIF:
$ stack build
$ stack exec nqueens-exe -- render --format gif -o nqueens.gif
The double dashes are there to tell Stack to pass everything else directly to our freshly compiled executable, rather than to interpret the command-line options itself.
Finally, pop the GIF open in your GIF viewer of choice. I'm going to use Firefox, just because it's convenient.
$ firefox nqueens.gifYou should see the following animation:

Congratulations! You've made your first animation.
If Reanimate exits successfully but a GIF file isn't generated, you might have an issue with your ffmpeg installation. For instance, I had an issue because the ffmpeg_4 available in Nix didn't produce any output. Try installing from a different source.
Step 2: Writing our own animations
The core type in Reanimate is an Animation. Which makes sense. Take a look at its data definition:
type Duration  = Double
type Time      = Double
data Animation = Animation Duration (Time -> SVG)
Pretty self-explanatory, right? An animation goes for a set amount of time, and at each point in time, we have a function that produces what should be shown at that time. Note that the Time parameter to the function only goes from 0 to 1, which allows you to easily multiply it with distances, rotations, etc.
In the previous step, we used some built-in Animations that Reanimate provides. Let's try writing our own from scratch now.
Providing a duration for our Animation is easy, but how do we write a function that generates SVGs? We don't have any SVGs right now to return. Thankfully, Reanimate.Svg.Constructors provides a bunch of handy functions for doing so. These are exported from the toplevel Reanimate module, so no need to import anything extra.
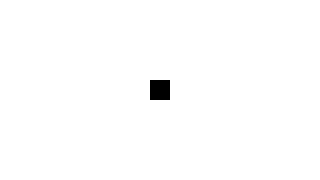
For now, let's just make a black square to display on screen.
box :: SVG
box =
  withStrokeWidth 0
    (withFillOpacity 1
      (withFillColor "Black"
        (mkRect 1 1)))  -- (width, height)
Plug everything together: create an animation in main to use in place of the built-in animations we used earlier.
main :: IO ()
main = reanimate (Animation 5 (\t -> box))
Note that Reanimate also provides a mkAnimation constructor to use instead of directly using the data constructor; we'll use that for the rest of this tutorial.
Finally, build and render again.
$ stack build
$ stack exec nqueens-exe -- render --format gif -o nqueens.gif
$ firefox nqueens.gif
Opening it, you should see the following animation, with our box in the center of the screen:
Step 2.1: Moving and grooving
We've got our own "animation," but it's not very... animated. Let's fix that.
First, let's talk about Reanimate's coordinate system. If you've worked with 2D computer graphics before, you might be used to (0, 0) being the top left corner, with positive X going to the right, positive Y going downwards.
Reanimate doesn't work like this. Instead, Reanimate is optimized for making mathematical animations, the kinds you'd see on 3Blue1Brown. So it uses Cartesian coordinates, with positive X going to the right, positive Y going upwards. (0, 0) is the center of our canvas.
Additionally, Reanimate has a fixed canvas size of 16x9 (in arbitrary units). So the top right corner is (8, 4.5), the bottom left corner is (-8, -4.5), and so on.
Knowing all this, we can start bringing our animation to life. Reanimate provides convenient functions transform, rotate, rotateAround, etc. in Reanimate.Svg.Constructors. These are also exported from the toplevel module. Since the function we write takes in a time parameter, we can multiply our total rotation by that to change how rotated the square is at any given point in time and get it to spin around its center:
main :: IO ()
main = reanimate
  (mkAnimation 5
    (\t -> rotate (360 * t)     -- a full circle counterclockwise
                  box))
Note that the amount of rotation is specified in degrees, not radians!
We can also move the square around using translate:
main :: IO ()
main = reanimate
  (mkAnimation 5
    (\t -> translate (5 * t) (3 * t) box))
Or do both at once:
main :: IO ()
main = reanimate
  (mkAnimation 5
    (\t -> translate (5 * t) (3 * t)
             (rotate (360 * t)
               box)))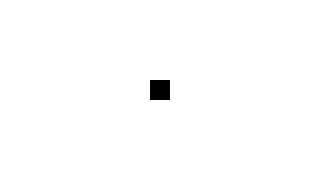
Step 3: Loading an external SVG
Since we're making an NQueens animation, we'll need an image of a queen, right?
We'll be using this queen SVG, from Creative Commons:

Place it inside the toplevel of your project, as queen.svg.
Import Graphics.SvgTree from reanimate-svg. Where the main Reanimate library provides mostly utilities for moving SVGs around, loading or creating SVGs is done through reanimate-svg. In this case, we'll be using the loadSvgFile function.
Load in the SVG file in main...
import Graphics.SvgTree

main :: IO ()
main = do
  Just queen <- loadSvgFile "queen.svg"
  reanimate ( ... )
loadSvgFile returns Maybe Document, so we'll just assume for now that it successfully parses the SVG file.
However, note that loading gives us back a Document type, not an SVG type. So we'll need to figure out some way to convert if we want to display it.
Looking at the definition of Document, we can see that it contains a list of element Trees, and Reanimate has a function mkGroup to combine multiple Trees into a single Tree, since SVG is just a type alias for Tree.
main :: IO ()
main = do
  Just queen <- (fmap . fmap) (mkGroup . _elements) (loadSvgFile "queen.svg")
  reanimate (mkAnimation 5 (\t -> queen))
Hm. We've loaded our SVG, but why isn't anything showing up?
Think back to the coordinate system. Our queen SVG is 45x45, but the Reanimate canvas is 16x9. So right now the image we've loaded in is actually too large to be shown on screen. Once again, though, Reanimate has some handy functions to help with this: scaleToWidth and center (to move an image to the center of the canvas).
-- let's move this out since it's getting long
queenSvg :: IO SVG
queenSvg = do
  Just queenDoc <- loadSvgFile "queen.svg"
  pure (center (scaleToWidth 1 (mkGroup (_elements queenDoc))))

main :: IO ()
main = do
  queen <- queenSvg
  reanimate (mkAnimation 5 (\t -> queen))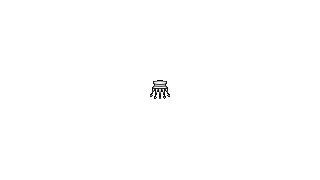
At which point you can see that our queen is accidentally upside-down. Easy enough to fix, just do a quick rotate:
queenSvg :: IO SVG
queenSvg = do
  Just queenDoc <- loadSvgFile "queen.svg"
  pure (rotate 180 (center (scaleToWidth 1 (mkGroup (_elements queenDoc)))))
But why was it upside-down in the first place? It's because of the trick that Reanimate used to make its coordinates Cartesian; essentially it's wrapping a vertical flip around your entire animation so that the Y axis goes in the opposite direction. But that has the consequence of flipping any SVGs you load in, which presumably were created assuming normal SVG coordinates.
Note that image loading has been changed dramatically in newer versions of Reanimate. Most of this silliness has been solved by the mkImage function. Unfortunately, 0.1.8.0 is the latest version of Reanimate currently available in Stackage, so that's what we have to use here.
With all that out of the way, now you can start moving the queen around the same way we did for basic shapes in previous steps.
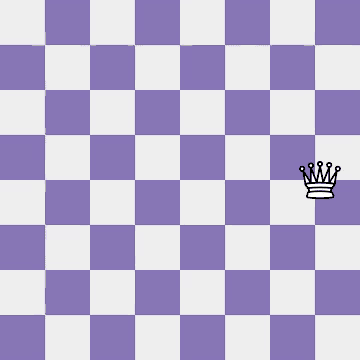
Step 4: Drawing the chessboard with SVG constructors
We've already seen how to create a rectangle using convenience functions that Reanimate provides for us. We could make our chessboard the same way, but let's try doing it using the actual data constructors in reanimate-svg. Doing it this way gives us more control over exactly what SVG gets emitted, and also lets us use SVG features that aren't exposed by Reanimate proper. For instance, Reanimate version 1.8.0 (which is the one inside the Stackage snapshot we're using) doesn't have a function for setting the line color to an arbitrary RGB value.
Add lens to the dependencies in package.yaml, and import Control.Lens, as these make working with reanimate-svg much more tolerable.
First, let's make a rectangle again:
boardWidth :: Double
boardWidth = 9

boardBackdrop :: SVG
boardBackdrop = RectangleTree
  (defaultSvg
    & rectUpperLeftCorner .~ (Num (-8), Num (-4.5))
    & rectWidth           ?~ Num boardWidth
    & rectHeight          ?~ Num boardWidth
    & fillOpacity         ?~ 1.0
    & strokeOpacity       ?~ 0.0)

main :: IO ()
main = do
  ...
  reanimate (mkAnimation 5 (\t -> boardBackdrop))
What's going on with this definition? Let's break it down.
RectangleTree is just a constructor provided by the toplevel Tree type; Tree is just a sum type describing all the possible things an SVG could be. In this case, it just holds a Rectangle.
More interesting is the Rectangle type itself. As you can see, we're using defaultSvg to construct a... default SVG for a rectangle. Many SVG elements have similar fields, such as fill color, stroke color, font, and so on. Reanimate relies heavily on typeclasses and lenses to allow you to transparently access these common fields without having to worry about the specific structure of what you're working with. So the WithDefaultSvg typeclass lets you initialize SVG elements easily, HasDrawAttributes lets you access things like fill color easily, and so on.
What's with the Num wrapper for our width and height? Why can't we just pass a Double? Reanimate acts as a fairly thin wrapper over the underlying SVG functionality, and one of the things that SVG allows you to do is specify scalar quantities in various units. If you've worked with CSS, you've probably seen units like 10%, 1.4em and so on for values relative to the current screen size or font size. SVG allows these too, so we have to explicitly let reanimate-svg know what we want. You can see all possible options in the Number type.
Finally, to tie it all together, we use the (&) operator (reverse function application) from Data.Function to chain all our lens functions together without lots of nesting.
We've got our rectangle, now we just need to make it the right color. For the NQueens animation, I used #8877B7 for the darker squares and #EFEFEF for the lighter squares.
Looking at the type for the fillColor lens, we can see that it takes in a Last Texture. It being wrapped in Last doesn't really matter; we just care about creating a Texture. And looking at the definition, what we care about is the ColorRef constructor, which needs a PixelRGBA8 from the JuixyPixels package.
So add JuixyPixels to your dependencies, import Codec.Picture.Types, and let's see if we can't make our backdrop the right color.
import Codec.Picture.Types

boardBackdrop :: SVG
boardBackdrop = RectangleTree
  (defaultSvg
    ...
    & fillColor .~ pure (ColorRef (PixelRGBA8 0x88 0x77 0xB7 0xFF)))
As an exercise, try creating the smaller, lighter squares and arranging them to create the full chessboard, like so:
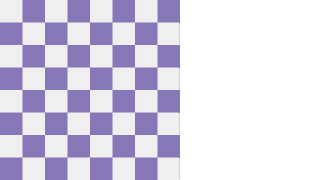
You should have a single, top-level definition for chessboard :: SVG that contains all the tiles. You'll likely want to use the mkGroup function to combine everything together.
Step 5: Gluing together animations using combinators
Reanimate wouldn't be much of an animation library if there wasn't a way to take lots of small animations and build them up into longer ones. Thankfully, the library provides a whole host of functions for gluing animations together, modifying what gets displayed by an animation, and so on. You can see all of them in Reanimate.Animation. For gluing together animations, the functions you'll use most are seqA, parA, and andThen.
-- play first animation, don't keep onscreen, play second animation
seqA    :: Animation -> Animation -> Animation
-- play both animations in parallel
parA    :: Animation -> Animation -> Animation
-- play first animation, keep onscreen, play second animation
andThen :: Animation -> Animation -> Animation
Let's try animating our queen from earlier. Rotate first, then move to the left.
main :: IO ()
main = do
  queen <- queenSvg
  reanimate (rotateAnim queen `seqA` moveLeftAnim queen)

  where rotateAnim :: SVG -> Animation
        rotateAnim svg =
          mkAnimation 2.5 (\t -> rotate (360 * t) svg)

        moveLeftAnim :: SVG -> Animation
        moveLeftAnim svg =
          mkAnimation 2.5 (\t -> translate ((-5) * t) 0 svg)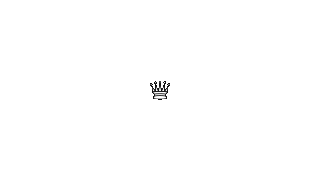
In general, you should use 'seqA' over 'andThen' to build up animations whenever possible. Since 'andThen' leaves the contents of the previous animation on-screen, it's easy to accidentally leave behind large amounts of junk SVG elements that are obscured by later animations. This can increase the file size of the generated frames and bloat your rendering times.
Step 6: Smoothing animations using signals
So far all the movements we've done have been linear: constant speed, constant rotation. This works, but it looks stiff.
Reanimate provides a function signalA; we pass it a "Signal" that maps time values, and that allows us to adjust the "flow" of time within our animations. So rather than us having to explicitly calculate how much an image should be translated or rotated by at a specific time in order to achieve smooth curves, we can just speed or slow down time at specific points (like the beginning or end) and let Reanimate figure out the rest.
Let's try it with our queen animation, along with the built-in curveS Signal:
main :: IO ()
main = do
  queen <- queenSvg
  reanimate (signalA (curveS 2) (rotateAnim queen)
      `seqA` signalA (curveS 2) (moveLeftAnim queen))

  where rotateAnim :: SVG -> Animation
        rotateAnim svg =
          mkAnimation 2.5 (\t -> rotate (360 * t) svg)

        moveLeftAnim :: SVG -> Animation
        moveLeftAnim svg =
          mkAnimation 2.5 (\t -> translate ((-5) * t) 0 svg)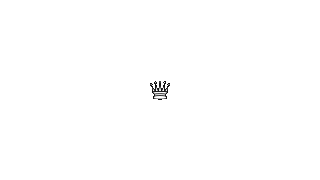
You can see all the available Signals in Reanimate.Signal.
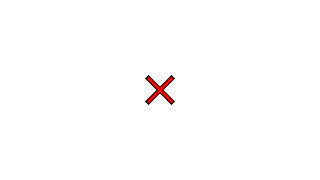
Step 7: Drawing more complicated figures using paths
Simple shapes like rectangles and circles are all well and good. But in the NQueens animation, we've also got red crosses that appear on top of conflicting queens. Two rectangles won't cut it for this, since we also want the cross to have an outline. How do we draw more complicated shapes?
SVG provides the functionality to draw arbitrary polygons and curves using paths, and naturally reanimate-svg has an interface to this. We just need to construct a Path and provide a list of PathCommands like MoveTo, LineTo, QuadraticBezier, and so on.
One slight complication is that we need the linear package to package 2D points in a way that a PathCommand will accept. So go ahead and add that to your package.yaml dependencies, and import Linear.V2.
Once you've done that, we can create the outline of our cross.
import Linear.V2

cross :: SVG
cross = PathTree
  (defaultSvg
    & strokeWidth .~ pure (Num 0.05)
    & pathDefinition .~
      [ MoveTo OriginAbsolute [ V2 0 0 ]
      , LineTo OriginRelative
        [ V2 crossLimbWidth 0
        , V2 0 crossLimbLength
        , V2 crossLimbLength 0
        , V2 0 crossLimbWidth
        , V2 (-crossLimbLength) 0
        , V2 0 crossLimbLength
        , V2 (-crossLimbWidth) 0
        , V2 0 (-crossLimbLength)
        , V2 (-crossLimbLength) 0
        , V2 0 (-crossLimbWidth)
        , V2 crossLimbLength 0
        ]
      , EndPath
      ])
  where crossLimbWidth  = 0.2
        crossLimbLength = 0.8

main :: IO ()
main = do
  ...
  reanimate (mkAnimation 5 (\t -> cross))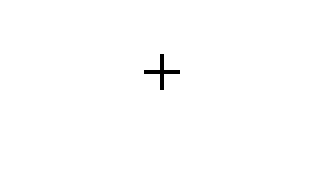
After that, it's just a matter of setting the draw attributes as we've done previously, and rotating the result.
cross :: SVG
cross = rotate 45 $ center $ PathTree $
  defaultSvg
    & strokeWidth   .~ pure (Num 0.05)
    & strokeColor   .~ pure (ColorRef (PixelRGBA8 0x00 0x00 0x00 0xFF))
    & strokeOpacity ?~ 1.0
    & fillColor     .~ pure (ColorRef (PixelRGBA8 0xFF 0x00 0x00 0xFF))
    & fillOpacity   ?~ 1.0
    & ...
Step 8: Converting/cropping/optimizing with ffmpeg and gifsicle
One last piece before you should have everything you need to recreate the NQueens animation. Up till now, we've been only outputting to GIF and not messing with the render parameters. This has some problems:
- In 0.1.8.0, Reanimate doesn't seem to have any way of outputting GIFs with a horizontal resolution greater than 320 pixels. So if you want a higher-res GIF, you're out of luck. This has been changed in newer versions of Reanimate.
- Reanimate uses
ffmpegto convert the output SVG frames into a GIF. But the GIFs thatffmpegoutputs can be somewhat larger, in terms of file size.
But it's not as if the output that Reanimate gives us is a black box. Instead of treating it as the final product, we can do more post-processing to get it to look how we want. And we've already got one of the programs we need to do that installed: ffmpeg itself.
Reanimate can also render to MP4 and WebM, and thankfully both of these allow you to render to arbitrary resolutions. So our flow will look something like:
- Tell Reanimate to render to MP4
- Use
ffmpegto crop out a square video, and convert to GIF - Run that GIF through some sort of GIF optimizing program (we'll use
gifsicle)
Install gifsicle, and then in place of the simple rendering command we've been using, run the following:
$ stack exec nqueens-exe -- render --format mp4 -o nqueens.mp4 \
   -w 640 -h 360 --fps 24
$ ffmpeg -i nqueens.mp4 -f gif -filter_complex \
   "[0:v] crop=360:360:0:0,split [a][b]; [a] palettegen [p]; [b][p] paletteuse" \
   nqueens.gif
$ gifsicle --batch -O3 -i nqueens.gif --colors 16
For gifsicle, we tell it to run in-place, make aggressive optimizations with -O3, and reduce the amount of colors used to 16 to cut down on file size. For ffmpeg, the options we're using are a bit more complicated; effectively we're cropping out just a square chessboard, then generating a palette for our eventual output GIF to improve the quality.
And voila. We're not all the way to a completed animation yet, but you now have all the tools and knowledge you need to work your way to the rest.
Found this useful? Still have questions? Talk to me!
Before you close that tab...
Want to become an expert at Haskell, but not sure how? I get it: it's an endless stream of inscrutable concepts and words, as if you've stepped into some strange bizarro world. Where do you even start? Why does any of this matter? How deep do these rabbit holes go?
I want to help. What if you always knew exactly what the next signpost on your journey was, if you always knew exactly what to learn next? That's why I created a Roadmap to Expert for you: a checklist of everything you need to know, sorted by difficulty, broken down into individual, easily-digestible chunks. Best of all: it's free! Just sign up for my email list below.
And there's more where that came from: Only a fraction of what I write ends up on this blog. Sign up and get advice, techniques, and templates for writing real, useful programs, straight to your inbox.
Absolutely no spam, ever. I respect your email privacy. Unsubscribe anytime.